
Your Guide To Understanding WooCommerce


If you want to run an online store, then the WooCommerce plugin could be the ideal solution for you. But before launching into how great WooCommerce is and how you can use it to streamline things for your business, we thought it would be great to help you understand the basics.
First things first…
What is WooCommerce?
A customisable eCommerce platform you can use on your WordPress website – basically, it helps you to build and manage your business’s online store.
Since it’s launch in 2011, this platform’s popularity has skyrocketed, and according to Built With, more than 4.5 million sites are actively using it – in other words, it’s proven to be effective for millions of users. But the benefits of this platform doesn’t end there…
- It’s incredibly efficient – and we’re talking about both time and cost-wise here. It doesn’t take forever and a day to set up, and there’s a range of extensions you can browse through to find the ones that are right for you. All in all, there are tons of tools and resources which can make your workflow simpler and streamlined, and it’s up to you to decide which ones you want to use.
- With more than 500 extensions available you can customise the platform to specifically suit your business’s needs. And just to help make things that bit easier we’ve added a link to the WooCommerce extensions so you can look through them at your leisure.
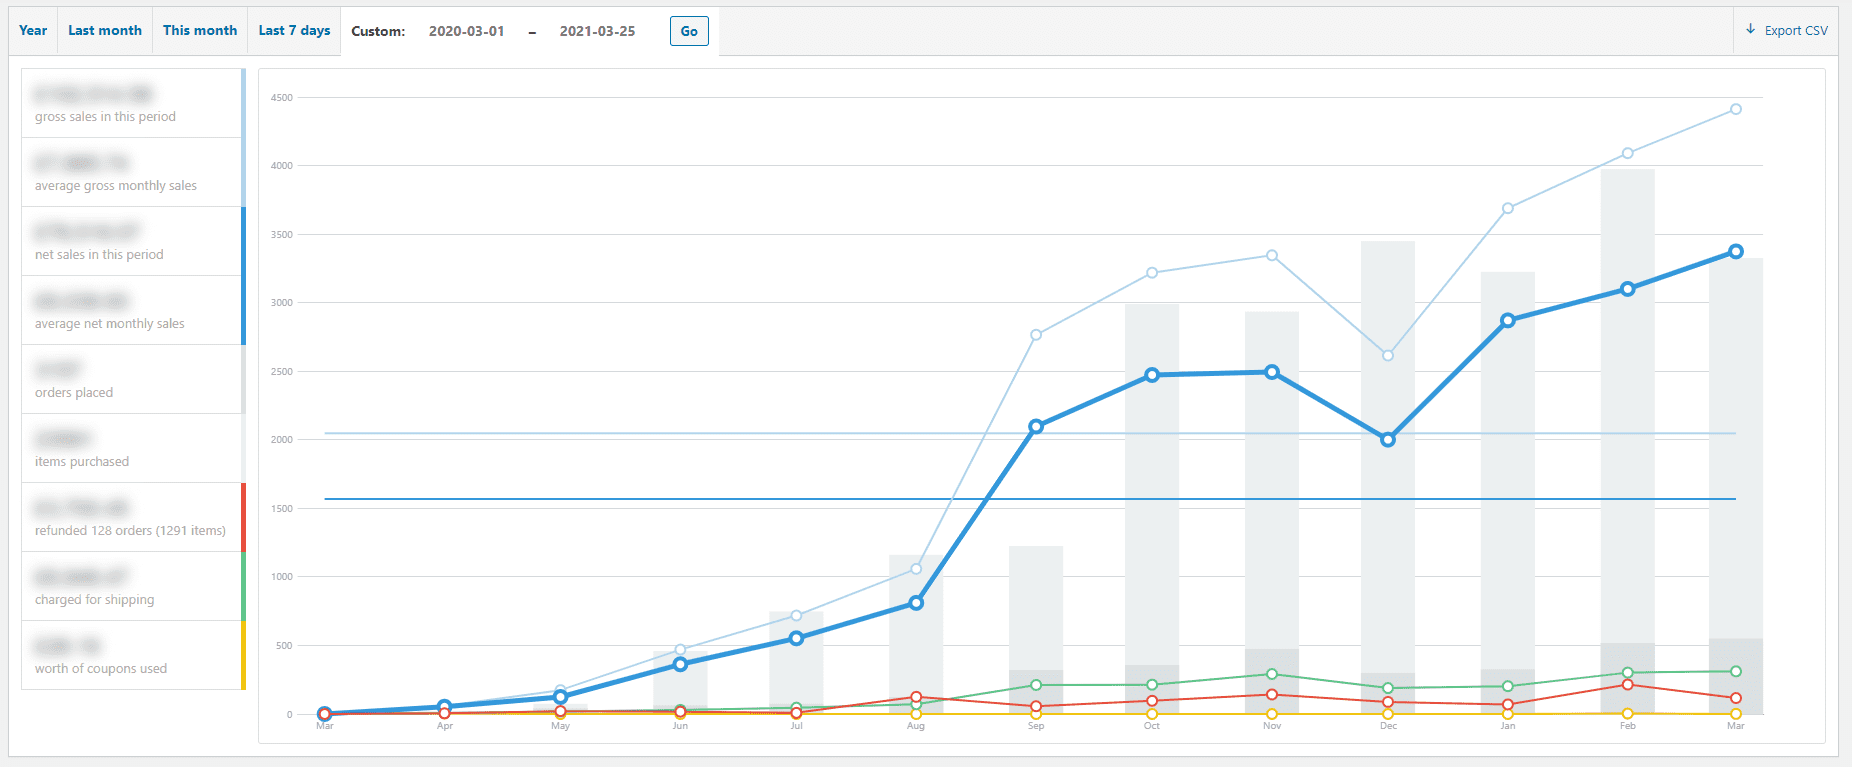
- Users with sites that use WordPress 5.3+ have the option to use WooCommerce Analytics, we make it easier for them to control and manage their online store as you don’t have to worry about doing all sorts of calculations yourself (so it virtually eliminates the risk of misunderstandings about cash flow), to give you an idea of some of the kind of metrics you can see, we’ve listed a few here:
- Total Tax
- Net Sales
- Refunds
- And much, much more!
Getting Started!
Okay, so to help make things a bit simpler, we’ll walk you through how can access your WooCommerce account – first of all, you are going to need to be logged into your WordPress account.
Once you’re logged in and have selected “WooCommerce” from the sidebar to your left, you’re going to be met with a few different dashboards. But before you start looking through, we’ll let you know that in this blog, we’re going to be focused on: Settings Panel, Orders List and Products Area.
Before we dive into the Orders or Products section, we thought we’d give you a bit of a run-through of the Settings Panel, and the more techy sides if you’re setting up your WooCommerce account or need to make changes.
Settings Panel
Here you can see the initial tabs that appear on your Settings dashboard – you can configure all aspects of your WooCommerce platform. Feel free to click through the different tabs and alter them as you see fit – in the case of this blog post, we’re going to focus specifically on the “General” panel and the type of information that you’ll need to input.

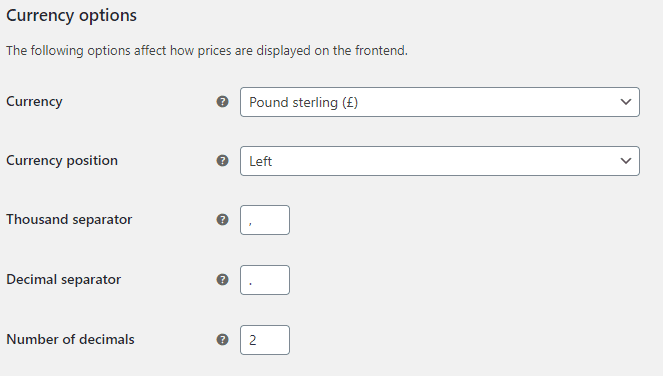
If you scroll down a bit further on the “General” tab, you will be able to see the section for “Currency” – all you’ll need to do here is input the currency that is relevant to your location!
(IMPORTANT – the currency you choose here is going to affect the prices which are shown on the front end of your site).
Now we’re almost done explaining the general page, but just to make sure you know exactly what else you can modify, test and trial, here are a few more things to make a note of.
- Tick a checkbox allowing coupons to be used on your website.
- Important – to confirm you’re happy with all the changes you need to make sure you hit the blue “Save Changes” button right at the bottom of the page.
Now we’ve covered all the basics, we’ll dive straight into how you can actually start using the platform to make things simpler as you run the day-to-day part of managing WooCommerce – in the section below we’ll walk you through how you can easily process and manage business orders.
Orders List
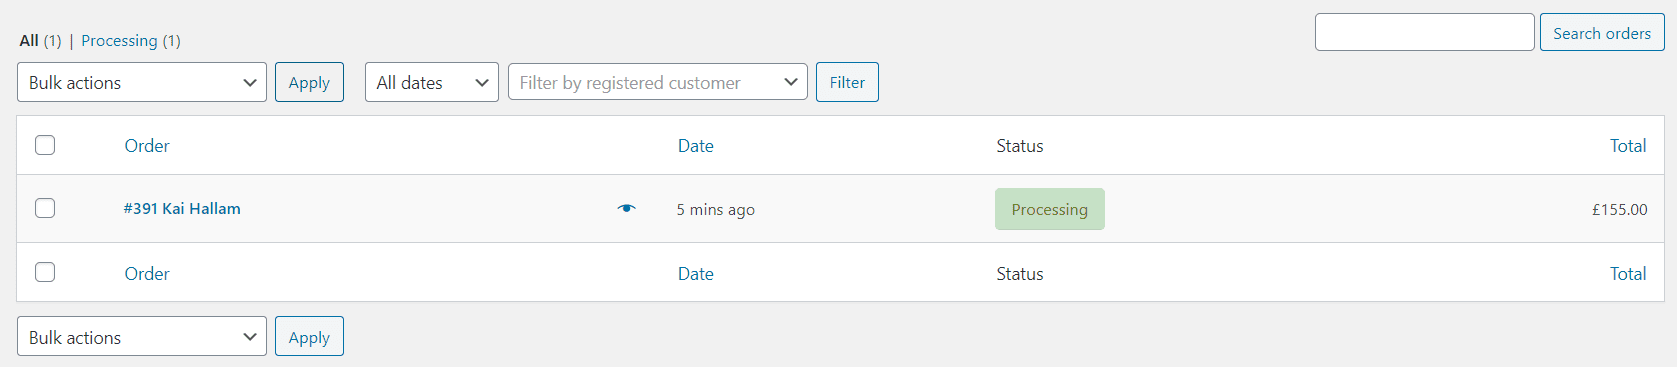
Okay so the title is pretty self-explanatory, it’s basically the screen where you can view all orders that have been sent into your business – if you’d take a look at the screenshot below, you will notice there is a list of “Orders” and you’ll be able to see some key details like:
- The names of those who have made the order – in this case: Kai Hallam
- When the order was made – in this case: 5 minutes ago
- The “Status” of the purchase – in this case: “Processing”
How To Check & Alter Order Status
To help make managing the “Status” of your orders nice and easy we’ve listed the basic package level statuses you’ll have open to you when start working with WooCommerce. If you’re curious as to how you can customise your use of WooCommerce even more, you should check out the 3rd party plugins you can use (i.e. you can see more from the site we linked above). But for now, we’re going to focus on just the basics that come with WooCommerce:
- Pending Payment – Unpaid
- Processing – Payment made and overall order is awaiting completion
- Completed – Order sent
- Failed – Declined / Unpaid
- Cancelled – Either by an admin or customer (stock is increased)
- On-Hold -Waiting for payment (Stock will be decreased)
- Refunded – Sorted by an admin – no additional steps needed
- Authentication needed – Waiting on a customer to authenticate and/or go through SCA steps
A Quick Walkthrough Of How Statuses Work:
So that you can see how these Statuses can change in a real-life scenario where you’d change the orders manually, we’ve just listed 2 quick steps that typical order (without any hiccups or issues!) will go through:
- Once an order has been placed, you’ll notice it’s status is shown as “Processing”
- HOWEVER, if no payment has yet been made, then the status will instead show as “Pending Payment”
- If you are happy that a payment has been made to your account, then you’ll need to move to make sure that the order is now being processed.
- After everything for the order has been sorted, you’ll need to mark it as “Completed”.
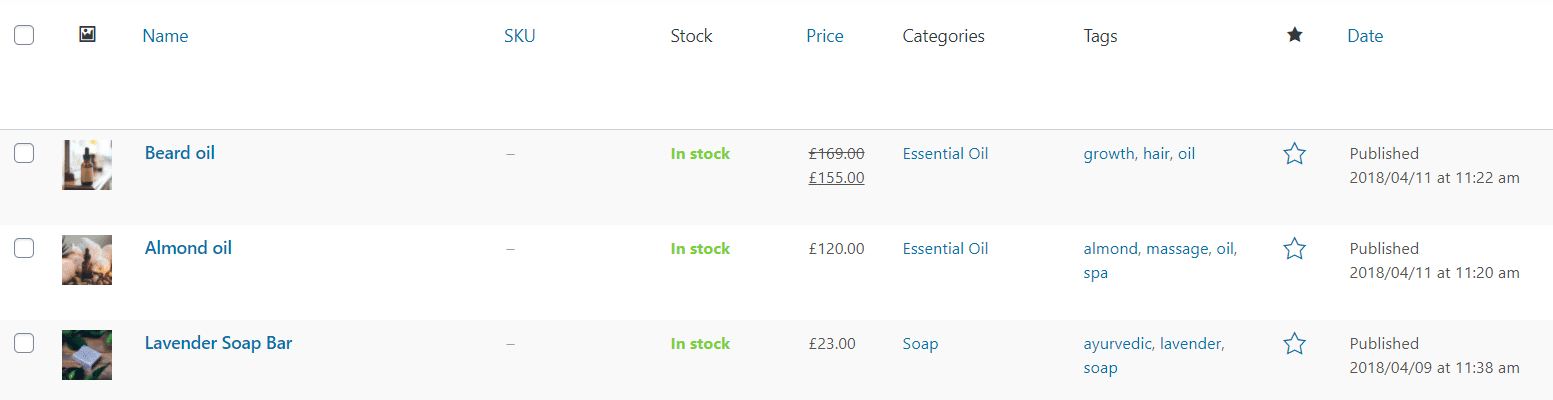
Products Area
Here we have a screenshot of what your “Products Area” screen will look like (but picture your own products/services instead 🙂 ) – you will notice that this dashboard presents key information about the products such as:
- If you have the product in stock
- The price you’re selling the item for – you can easily see if you added a discount price – like our Beard Oil example (this shows up as the sale price).
- All of your products will be labelled with tags and the category they fall into – i.e.:
- Beard Oil is in the “Essential Oil” category and has the Tags “Growth”, “Hair”, and “Oil”
- This is a really important insight for helping you keep track of all your product ranges and how they’re performing.
- For example, you might be looking through your orders one day and notice that you’re getting a lot more orders for “Essential Oil” rather than “Soap” – this can allow you to ensure you manage your stock levels accordingly.
Adding A New Type Of Product
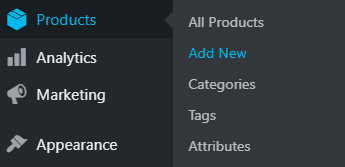
So that you know how to manually add a product, we’ll walk you through the steps needed.
All you’ll need to go is go over to the side panel to the left of your screen and select “Products” from the list and then select “Add New” from the dropdown menu.
- You can take a quick look at this screenshot below to make sure you’re selecting the right option:
You’ll be taken to a page where you can input all of the information about your brand new product – here we’ve just listed some of the basics (and where you can find them on the page):
- Product Name (see this right at the top of the page)
- Product Short Description (scroll a bit further down the page to see this. Important – this is different from the full description section which is directly underneath the “Product Name” section)
- Product Categories (choose whichever option is relevant to your new product or select “Add New Category” if none of the current categories suit)
What Are The Types Of Products You Can Add?
Before we show you how to get up and running with adding a product, we just wanted to make sure you were 100% clear on the different type of products that you can add (again this is with the WooCommerce basics, you might have already changed the platform to be a bit different).
- Simple Product – These type of products can be shipped but doesn’t show any additional fields for you to fill in (these are products that you provide, not a third-party).
- Grouped Product – Connected products that users have the option to buy individually and specifically related to “Simple Products”.
- External/Affiliate Product – Products that you can list on your site, but are actually sold by a third-party.
- Variable Product – Applies to products with various options available – i.e. different sizes.
- Simple Subscription – A product that is paid for regularly – i.e. you may want to charge £X amount in a specified slot of time – i.e. £10 every month.
- Variable Subscription – A product paid for regularly (you can specify this in settings) and it offers variations on the original product – i.e. choosing the colour of the shoes you’d like.
- Course – A course you are selling through your website.

Simply select whichever option is right for you, and don’t forget to include any key data! (i.e. “Regular Price” and “Sale Price”)
There’s also the option for you to tick the checkbox options for “Virtual” and “Downloadable” – so you know if these apply to you, we’ve outlined what they mean here:
- Virtual – Shipping isn’t necessary (applies to services for example) – when you click this option all shipping fields will be disabled. This type of product also means that the cart calculator, as well as the checkout, isn’t activated.
- Downloadable – with this option, you’ll see some extra fields where you can input a downloadable file – once users have gone through the process of making a purchase, they will get a notification email that includes a link to the file.
Feel free to go through the additional options: Inventory/Shipping/Linked Products (etc) and add in any relevant/applicable details – in this blog we won’t be diving too deeply into how to set this up.
And you’ve done it! You now know how to add a new product to your WooCommerce platform and configure all of the relevant settings for adding the product!
Manually Adding Orders
To keep things simple, we’ve completed a step-by-step walkthrough of how you can easily manage orders and manually add them.
- Select “WooCommerce” from the side panel and then click “Orders” from the dropdown – if you want to make sure you’re selecting the right options, take a look at the screenshot here:

- Now click “Add Order” (you’ll see it the second you click on this page)
- You’ll be presented with a new tab – simply fill in the relevant fields and once you’re happy with everything you’ve done, just hit the “Save” button.

- IMPORTANT – keep in mind that when you manually add an order, it’s not going to have any effect on your current stock/inventory levels, so make sure that you follow-up and manually make any changes needed.


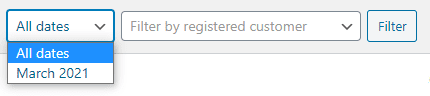
Filtering Information
When you have pages up pages of orders you’re not going to have time to look through all of the orders just to find the one you’re looking for (making things a lot easier to find when those orders start stacking up!) so use the “Filter” function, this will help you find exactly what you need in seconds.
All you’d need to do is enter the customer’s name into the search bar (you can also add a timeframe if needed!)
As soon as you hit that “Filter” button, you’ll be shown a list of results based on the data you’ve inputted (see, much easy than having to do this manually).
Here’s How To Arrange Orders
When it comes to how you want to view your orders, you can change them to either be in ascending or descending order, whatever is the best fitting of your needs. The columns that you can select to order things are:
- Order
- Date
- Status
- Total
Thanks for reading!
This has been your Guide To Understanding The Basics Of WooCommerce and understanding the ways you can configure settings, manage orders and control product listings.
We hope that you found this guide useful – if you did, then make sure to check us out on social media, we regularly post new content designed to make your life easier!