
How Subdomains Are Shown In Google Analytics Reports


The purpose of this blog is to help you to gain an understanding of the process involved in setting up a hostname filter in Google Analytics. By doing this, you are able to add your page’s subdomain information into your analytics reports.
Benefits
- By displaying subdomains in your reports, you will find it easier to accurately analyse traffic reports, helping you to see the different traffic that fit into your subdomains.
- It can simplify the analysing process after data has been collected – as it will reduce the steps you need to take when seeing which sessions took place in which subdomain.
- By utilising the filter, you are able to have the subdomain information transfer directly to your reports.
- This process is something that you’ll only need to do once per view.

Setting Up
You will need to begin by adding a Hostname filter:
-
- Open your Google Analytics Admin panel
- Choose the relevant account, property and view
- Important – The filters that you put in place permanently alter the incoming hits – this is why changes need to be done in the “Staging View” – to test the outcome of the changes made.
3. Select “Filters” and then “Add Filter” – you will then need to name it, before choosing the filter type, in this case, choose “Custom”.
-
- First drop-down – Click “Hostname”
- Second drop-down – Click “Request URL”
- Third drop-down – Click “Request URL” again
4. You will now need to click “Advanced” – this is what you will see:
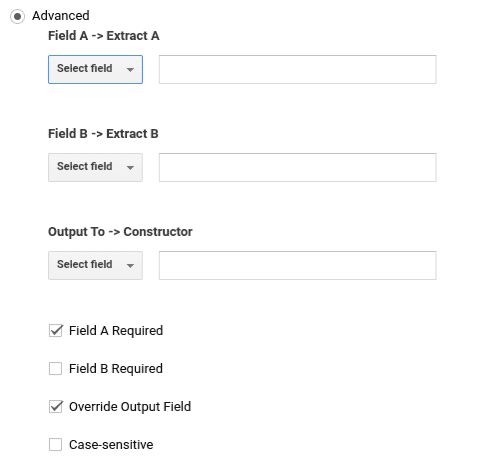
5. Now fill in the following settings:
- Field A – Extract A = (.*)
- Field B – Extract B = (.*)
- Output To – Constructor: $A1$B1
Once done, make sure to click “Save”.
6. You have now added the filter – you will be taken to your filter table, and what you have just put in place should be taking effect on incoming data.
Potential Impact on your Data
There is the possibility that some of your data may be impacted based on the changes that you have made – this will apply if you already have a Google Analytics property and it contains valuable past data.
Possible Impacts:
- “Destination” Goals that use: “Equals to” / “Begins with” match-type
- A few RegEx match-type Goals – if you currently have any active RegEx destination goals, then you will want to discuss this with the developer or person who implemented the goals (before making changes).
- To make sure that Goals keep working after the change, you will need to update the “Destination” field – it has to include your subdomain.
- “Dashboard” / “Custom Report” / “Custom Alert” – when the “page” dimension is used as the filter.
- Customisation applied to Google Analytics or third-party tool which utilises the “Page” dimension.
- It can be difficult to analyse time frames which include the date at which point the filter was implemented. The reason for this is because Google Analytics will be viewing all pages as different from the day that the changes are made.
It may be beneficial to instead apply these settings to a new view, rather than the ones you currently use – this means that the data you currently have will not be impacted.
Checking Filter Efficiency
You want to make sure that your filter has worked – something that you can do by following these steps:
- Open your website (make sure to use Chrome)
- Click the “Google Tag Assistant” Chrome Extension – then select “Record”.
- Refresh the page and click on the extension again – this time, click “Stop Recording”.
- You will then need to select “Show Full Report”.
- Now click “Google Analytics Report” and then choose the view you want to test – select “OK”
- Now you need to find the “Flow section” (you will see it further down the report), you will need to click “Page Load 1” before selecting “Hit 1”. The “Mutation” subsection will show you the change that happened in the reported hit.
You’re done!
You have successfully implemented this process into your Google Analytics setup – you should see the new data in your reports within a day – however, it is important to remember that the changes you’ve made will only have an impact on future data, not past data.
Thanks for reading.
Remember to check us out on social media!
We’ll post there every Friday about our upcoming blog posts, so you can keep connected.